WildCam: USB microscope camera app for Windows
Version 1.2 · Disclaimer
In short
- A small, free capture app for USB microscope cameras on Windows, written for a Hayear HY-800M on a phase-contrast microscope at 1000x.
- Why: the supplier's software could not save settings, so every session started with fiddling.
- It does five things: live image, the camera's own controls with their real ranges, named presets, JPG or PNG snapshots and video, and a measuring grid.
- The grid comes from one stage-micrometer calibration, rescaled to any resolution from the image width. A snapshot with the grid shown is saved twice, clean and annotated.
- It should work with any camera Windows treats as a standard webcam (UVC). It needs Python 3.10 or newer.
- Start with Install, then run the probe once.
WildCam is a small capture app for USB microscope cameras on Windows. It was written for a Hayear HY-800M on a phase-contrast microscope at 1000x, because the supplier's software made every session start with fiddling and could not save settings.
It does five things:
- shows a live image
- gives you the camera's own controls with their real ranges
- saves named presets
- takes JPG or PNG snapshots and records video
- overlays a measuring grid
Nothing else. It should work with any camera that Windows treats as a standard webcam ("driver-free" or UVC).
Version: 1.2 (2026-10-11). Free to use, change and share under CC0. Up to version 1.1 it was called scopecam.
Install
You need Windows 10 or 11 and Python 3.10 or newer.
- Download
wildcam-1.2.zipand unzip it. You get awildcamfolder withwildcam.py,README.mdandrequirements.txt. - Open a command prompt in that folder and create a virtual environment:
Note: Close the supplier's software. Only one program can use the camera at a time.
Run
First, probe the camera once:
The probe lists:
- each camera with its index
- every control the driver reports, with its range, default, current value and whether it is on Auto
- the formats that actually deliver frames, with measured frame rates
If anything misbehaves, this output is the thing to look at.
Then start the app:
| Command | Use |
|---|---|
python wildcam.py |
Normal use. pythonw wildcam.py hides the console window. |
python wildcam.py --camera 1 |
When the microscope camera is not camera 0. |
python wildcam.py --simulate |
Try the app without a camera (a drifting field of cells). |
python wildcam.py --config other.json |
Keep settings and presets in another file. |
The window
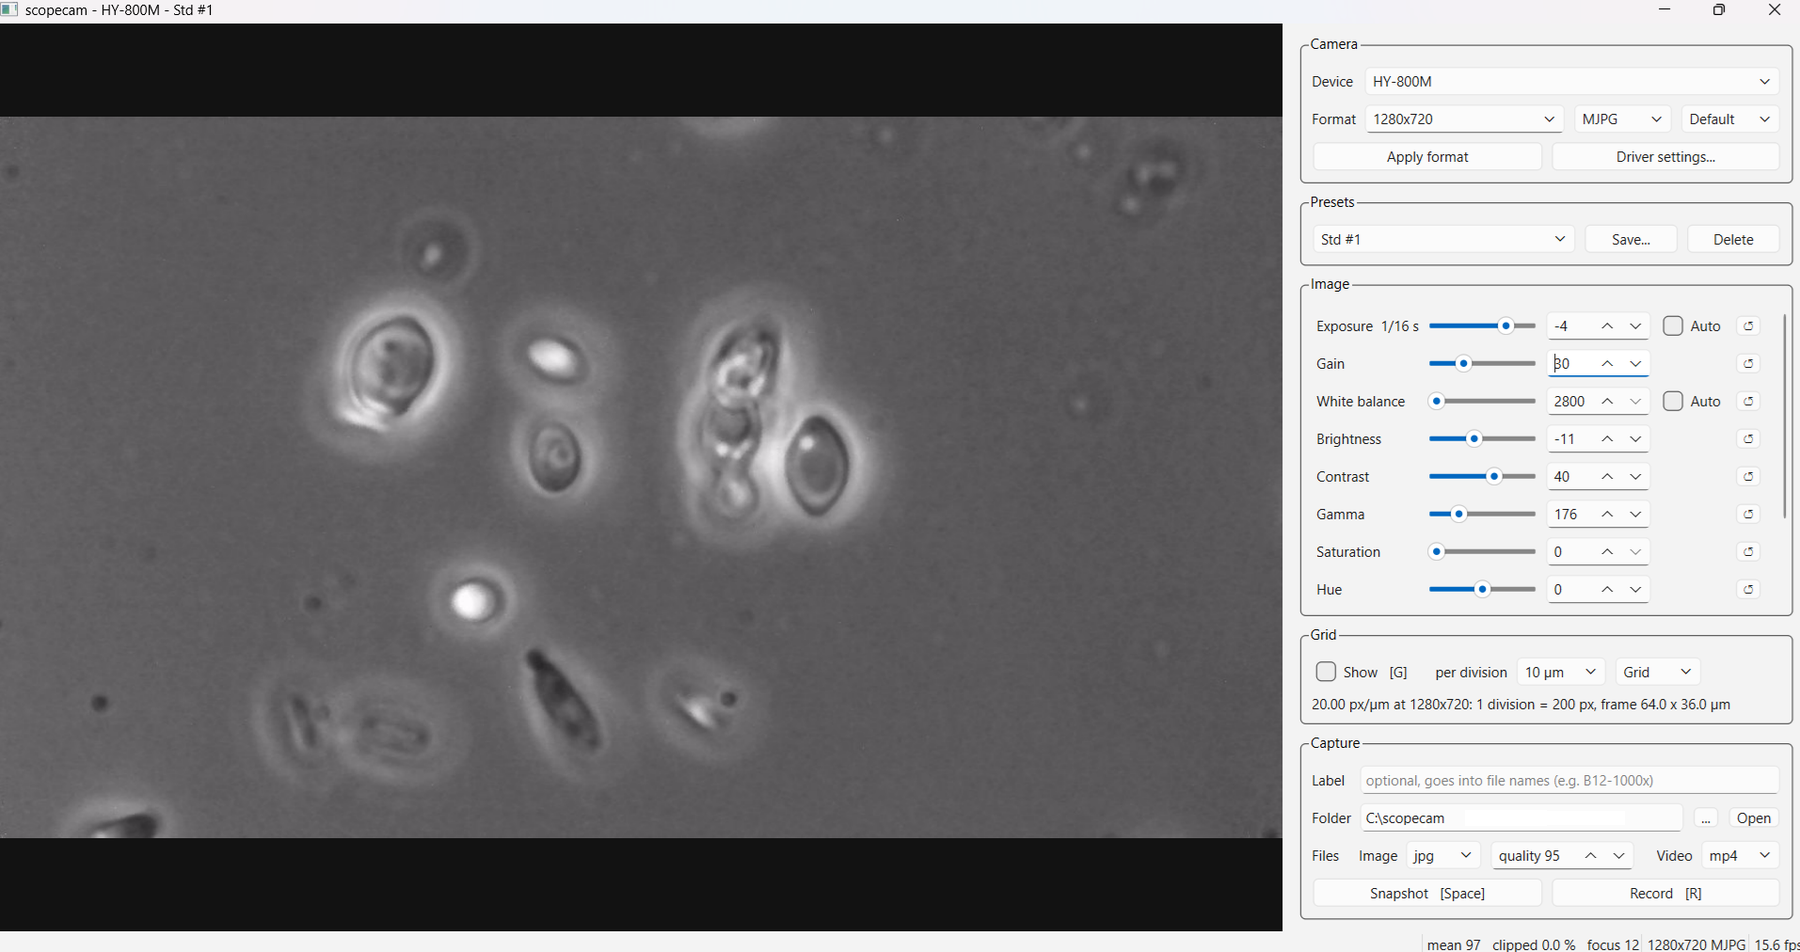 WildCam with an HY-800M at 1000x, preset "Std #1" loaded, grid hidden.
The live image fills the left side. Double-click it to switch between fitting the window and 100 % (centre of the image, pixel for pixel), useful for focusing.
The title bar shows the camera and the preset in use. An asterisk after the preset name means you have changed a control since loading or saving it.
Camera box
| Item | What it does |
|---|---|
| Device | Picks the camera. The list comes from Windows. |
| Format (three lists) | Resolution (for example 1280x720), pixel format (MJPG or YUY2) and frame rate. "Default" leaves the rate to the camera. Changes take effect only when you press Apply format. |
| Apply format | Reconnects the camera with the chosen format. If the camera gives something different, the status bar says what it gave. |
| Driver settings... | Opens the camera driver's own settings dialog. See "App controls and Driver settings" below. |
MJPG is compressed by the camera and fast. YUY2 is uncompressed, but USB 2.0 limits it to a low frame rate at 1280x720; it avoids JPEG artefacts on fine detail. Save one preset of each if you need both.
Presets box
A preset stores the format and the value and Auto state of every control in the Image box.
- To save: set the image up, press Save... (or Ctrl+S) and type a name. Typing an existing name asks before replacing it.
- To recall: pick the name from the list. The format and every control are applied at once; if the format differs, the camera reconnects first.
- To delete: pick the name, press Delete and confirm.
- The last preset you used is applied again when the app starts.
Presets and settings live in wildcam.json next to wildcam.py.
Image box
Only the controls your camera reports are shown, one per row:
- Slider and number box: set the value. Both stay in step, and the value is sent to the camera as you move.
- Auto: shown only for controls the camera can run itself (typically exposure and white balance). Ticking it hands the control to the camera, and the row then follows what the camera chooses. Moving the slider switches Auto off.
- ↺: resets the control to the driver's default.
A quick way to lock exposure and white balance: tick Auto on both, let the camera settle on a blank part of the slide, then untick. The values the camera chose are kept.
Exposure units are DirectShow's: log2 seconds, so -6 is 1/64 s and -4 is 1/16 s. Each step doubles or halves the exposure, so use gain or brightness for anything in between. The label shows the time.
App controls and Driver settings
The two sets of controls set the same thing: the standard properties held in the camera, such as exposure, gain, white balance and brightness. The app just shows them in its own layout.
- Read-back: while the driver dialog is open, the app does not follow it. When you close the dialog, the app reads every value back from the camera, so its rows show what the camera now holds.
- Extra settings: the driver dialog can show settings that are not standard controls, such as vendor extensions. The app cannot read those, so presets do not store them. If the probe does not list a setting, the app cannot change it.
- Recommendation: set up through the app's rows and save presets from there. Use Driver settings... only for something the app does not list.
Grid box
| Item | What it does |
|---|---|
| Show [G] | Shows or hides the grid. G does the same. |
| per division | 1, 5 or 10 µm per division. |
| Cross / Grid | Cross: ticks along two axes through the centre, numbered in µm every 5 divisions, like an eyepiece micrometer. Grid: lines across the whole image, brighter every 5 divisions. |
| Scale line | The scale in use: px/µm at the current resolution, the size of one division in pixels and the size of the whole frame in µm. It turns red with a warning if the resolution has a different shape from the calibration. |
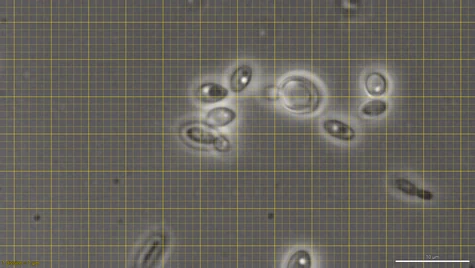 Grid style, 1 µm per division, 1000x phase contrast, no stain.
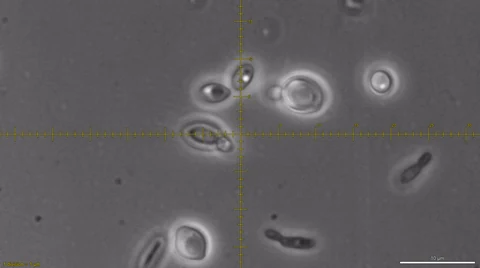 Cross style, 1 µm per division, same field.
Capture box
| Item | What it does |
|---|---|
| Label | Optional text at the start of file names, for example the sample and magnification. Characters that are not allowed in file names become dashes. |
| Folder | Where files are saved. ... chooses another folder; Open shows it in Explorer. |
| Image and quality | JPG (quality 50 to 100, default 95) or PNG. PNG avoids a second round of compression when pixel intensities matter. |
| Video | mp4 (MPEG-4 Part 2, small files) or avi (Motion JPEG, every frame a full image). |
| Snapshot [Space] | Saves the current frame. Space does the same. The view flashes white to confirm. |
| Record [R] | Starts and stops recording. R does the same. "REC" shows in the image while recording. |
Files are named <label>_<YYYY-MM-DD_HHMMSS>.jpg (or .png, .mp4, .avi). Every file also adds a line to captures.csv in the same folder: time, file, label, preset, camera, size, pixel format, frame rate and every control value.
- Video frame rate: the video's rate is fixed at the rate measured when recording starts. Frames are repeated or skipped as needed, so playback runs in real time.
- Exposure and recording: a long exposure lowers the camera's frame rate, so lock exposure before recording.
Status bar
| Item | What it shows |
|---|---|
| mean | Average brightness, 0 to 255. |
| clipped | Percentage of pixels at or near saturation. Keep it at or close to 0 %. |
| focus | A sharpness score for the centre of the image. Use it only to compare focus positions: higher is sharper. |
| Format and fps | What the camera is actually delivering. |
How the grid is drawn
The grid is drawn over the live image; the image itself is not changed.
- Saving: a snapshot taken while the grid is shown is saved twice. One copy is the clean image, exactly as without the grid. The other is
<name>_annotated.jpgwith the grid drawn in. Both get a line incaptures.csv. Videos never include the grid. - Layout: everything is centred on the image. The cross, or the brightest grid lines, pass through the centre, with divisions counted outwards from there.
- Labels: a scale bar of a round length (10 µm at 1000x) sits at bottom right, and "1 division = X µm" at bottom left.
Scale and resolution
The grid needs to know how many pixels make a micrometre. That comes from one calibration, stored under "scale" in wildcam.json:
"scale": {
  "px_per_um": 60.0,
  "ref_width": 3840,
  "ref_height": 2160,
  "note": "Hayear HY-800M at 1000x (100x oil), stage micrometer, 2026-10-01"
}
It was measured once, on a stage micrometer at 3840x2160. It does not need an entry per resolution. The app works out the scale for the resolution in use from the image width:
px/µm = 60 × width / 3840
| Resolution | px/µm | 1 µm division | 5 µm division | Frame |
|---|---|---|---|---|
| 3840x2160 | 60 | 60 px | 300 px | 64 x 36 µm |
| 1920x1080 | 30 | 30 px | 150 px | 64 x 36 µm |
| 1280x720 | 20 | 20 px | 100 px | 64 x 36 µm |
The Grid box shows the result for the current resolution (in the screenshot above: 20.00 px/µm at 1280x720).
This holds as long as the lower resolutions show the same field of view, scaled down rather than cropped. A resolution with a different shape (4:3, such as 1280x960) is often a crop or another sensor mode. For those, the Grid box turns red and warns that the grid may be off.
Calibrating for another objective or camera
The app keeps one calibration at a time.
- Put a stage micrometer on the stage and focus at the magnification you want.
- Set the resolution you will use and take a PNG snapshot.
- In any image viewer that shows pixel positions, measure a long known distance across the micrometer, for example 100 µm. Then px/µm = pixels / µm.
- Close WildCam. In
wildcam.json, setpx_per_umto that value andref_widthandref_heightto the snapshot's resolution. Updatenoteto say what it is. - Start WildCam, show the grid with 10 µm divisions over the micrometer and check that they line up.
If the file is unreadable or the values make no sense, the app falls back to the HY-800M at 1000x calibration.
Backlog
| Feature | Status |
|---|---|
| Stitching several snapshots into one larger image | Idea; exact feature to be decided |
Several named calibration profiles (camera, objective or eyepiece adapter), picked in the app instead of editing wildcam.json; first use: a second camera on a 3D-printed eyepiece adapter that captures the whole field in one frame |
Planned |
| Freeze button & hand-draw measure line | Planned |