Isolating Bugs (DRAFT)
Draft
This page is a draft. The process is settled, but many photos are still to be collected; each missing one is marked with a Photo to come box. Tips marked researched come from published sources, with a confidence tag (High/Med/Low) and a link; the rest come from my own work. Everything here is experimental home practice: read the disclaimer first.
Why isolate bugs
- Dregs make unbalanced cultures. Growing up bottle dregs usually gives a mixed culture dominated by strong acid producers and resistant bacteria. Building a mixed fermentation from individual strains gives some control over what ends up in the beer, and in what proportion.
- Cost. Buying three to five different commercial bugs for one batch is just too expensive.
- Choice. You get to pick up the bugs from bottles you really like.
The Holy Goat Shrinebuilder journey is a worked example of the whole process, and most of the photos below come from it.
The flow
Steps run top to bottom. Where a step fans out, the branches run in parallel (several plates, several tubes, several mini-beers). Dashed arrows are loops back when a round does not give clean results. Documentation (the box on the right) runs alongside every step.
flowchart TD
    S1["1 · Bottle selection and research"] --> S2["2 · Dregs under the microscope"]
    S2 --> S3["3 · Enrichment and selective media"]
    S3 --> P1["Plate: dilution 1"] & P2["Plate: dilution 2"] & P3["Plate: dilution 3 to 5"]
    subgraph step4 ["4 · Plating at several dilutions (3 to 5 plates)"]
        P1
        P2
        P3
    end
    P1 & P2 & P3 --> S5{"5 · Observe from day 3:<br/>target present and<br/>colonies separate?"}
    S5 -. "no: adjust dilution or media" .-> S3
    S5 -- yes --> S6["6 · Pick 3 to 5 lone colonies<br/>into sterile water"]
    S6 --> A1["Tube A"] & A2["Tube B"] & A3["Tube C to E"]
    subgraph step7 ["7 · Microscope check of each pick; discard mixed"]
        A1
        A2
        A3
    end
    A1 & A2 & A3 --> S8{"8 · Confirmation plating:<br/>plates clean after 2+ weeks?"}
    S8 -. "no, or first round: repeat" .-> S6
    S8 -- yes --> S9["9 · Pick 10 to 20 colonies<br/>into clear wort, traced"]
    S9 --> B1["Clear-wort tube 1"] & B2["Clear-wort tube 2"] & B3["Clear-wort tube 3 to 5+"]
    subgraph step9 ["Cultivate 2+ weeks"]
        B1
        B2
        B3
    end
    B1 & B2 & B3 --> S10{"10 · Full slide at 1000x:<br/>clean?"}
    S10 -. "no: correlate with plates, repeat" .-> S8
    S10 -- "yes: keep 2 to 3 tubes" --> S11["11 · Banking on slants, traced"]
    S11 --> S12["12 · Step up in sterile wort"]
    S12 --> M1["Mini-beer: temperature 1"] & M2["Mini-beer: temperature 2"]
    M1 & M2 --> S13["13 · Assess the mini-beers"]
    DOC[["Documentation, all along:<br/>colony and cell morphology,<br/>plate smells, dates, media,<br/>temperatures, mini-beer notes"]]
1 · Bottle selection and research
Start from a beer you really like, and find out as much as you can before opening it: read the label and the brewery's description, and ask the brewer. Knowing roughly what is in the bottle (which yeasts, whether there are bacteria, whether it was bottled with a separate yeast) tells you what to look for on the plates and what to expect under the microscope. For Shrinebuilder, the brewery's own description named a blend of Brettanomyces strains, and earlier messages with the brewery had filled in some of the process.
Photo to come
The bottle and label, and any brewery description used in the research.
Tip
Ask the brewer. Most will tell you whether the bottle carries the house culture or a separate bottling yeast. Assume any large, fast Saccharomyces in the dregs may be bottling yeast until a mini-beer says otherwise.
Tip (researched, Med)
Use the youngest bottle you can find, preferably under a year old; viability falls with age, although Brett has been recovered from bottles over ten years old. Check the beer is not pasteurised. Source: Milk The Funk: Commercial Beer Dregs Inoculation.
2 · Dregs under the microscope
A first look at the dregs, diluted straight from the bottle: which kinds of cells are there, roughly in what proportion, and how healthy they look. It is not easy: bottle dregs carry plenty of proteins and debris that get in the way. In the Shrinebuilder dregs there were Saccharomyces and Brett cells, rod-shaped bacteria singly and in pairs, and a lot of debris.
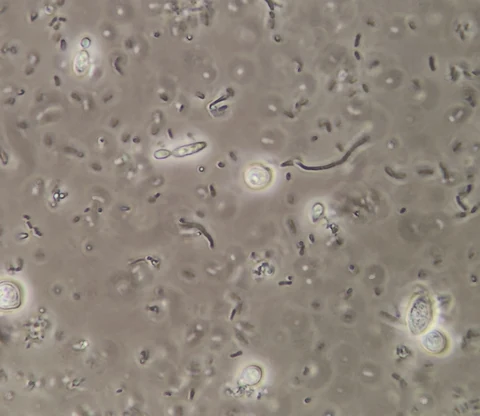 Shrinebuilder dregs · 1000x oil immersion, phase contrast, no stain
Tip
Treat this view as a list of suspects, not an identification. Note what you see (cell shapes, sizes, bacteria as rods or cocci, singles, pairs or chains) so the plates can be read against it later.
Tip (researched, High)
Brett is hard to tell apart by eye: some strains look like S. cerevisiae, others are elongated or much smaller. Pediococcus are round to egg-shaped cocci that stick together in pairs or clumps, the only beer lactic acid bacteria to do so, which identifies them at genus level. Sources: Milk The Funk: Brettanomyces, Milk The Funk: Pediococcus.
3 · Enrichment and selective media
Where needed and available, grow the dregs up on a medium that favours what you are after before plating. I don't plate straight from the dregs: I revitalise them in sterile wort first. A heavily hopped wort slows hop-sensitive bacteria while the yeast recovers; in the Shrinebuilder sample the lacto was hop intolerant, so it was held back while the yeast revitalised. Indicators in the medium are optional.
Photo to come
Enrichment starter: dregs revitalising in sterile (hopped) wort.
Tip (researched, High)
Hops inhibit most Lactobacillus and Pediococcus: iso-alpha acids disrupt the pH gradient across the cell membrane. Some strains carry hop-resistance genes (horA, horB, horC), so hopped wort slows bacteria rather than guaranteeing their removal. Source: Escarpment Labs: hop resistance in lactic acid bacteria.
Tip (researched, Med)
Selective and differential media used in brewing labs: WL Nutrient (WLN) with bromocresol green as a pH indicator separates colony types by colour; WL Differential (WLD) is the same with cycloheximide (0.004 g/L), which stops brewing Saccharomyces while most Brett still grows (smaller colonies; resistance varies by strain); chloramphenicol removes bacteria; Lin's Cupric Sulphate Medium (LCSM) favours non-Saccharomyces and wild yeast; MRS is used for Lactobacillus and Pediococcus. Sources: Milk The Funk: Laboratory Techniques, Brew Science: WLN/WLD plating, WLD agar data sheet, Brewing Science Institute: contamination media.
Cycloheximide and antibiotics
Cycloheximide is toxic. Handle antibiotics and selective agents with gloves, follow the supplier's safety data sheet, and keep them away from food and brewing equipment.
4 · Plating at several dilutions
Plate the enriched culture at three to five dilution levels. The bugs grow at different rates, and the ones we are usually after are the slowest, so bacteria (and sometimes fast-growing mould) can take over a crowded plate. The right dilution gives cells well separated, with still a few colonies of what you are after.
Photo to come
The dilution series: tubes and the matching set of labelled plates.
Tip (researched, High)
Tenfold serial dilutions (1 mL into 9 mL sterile water, repeated) cover a wide range with few plates. Incubate plates upside down so condensation does not drip onto the agar, and seal them to limit drying over long incubations. Source: standard plate-culture practice.
Tip (researched, Med)
Incubation temperature can change which organisms grow well on the same plate, so a second set at a different temperature can help with a stubborn sample. Source: Milk The Funk: Wild Yeast Isolation.
5 · Observe the plates and assess colonies
Look at the plates from day 3, then every day or every other day. How fast a colony appears is a first hint of what it is. Assess by colony morphology (size, shape, surface, edge, colour) and aim first to spot the undesirable or harmful bugs. If the organisms you want are not there, or the plate is too crowded to find lone colonies, adjust the dilution and/or the medium and start over.
On the first Shrinebuilder plate (wort agar, ~21 °C) the Brett colonies only started to appear after 2+ weeks: tiny smooth colonies were Brett, big smooth ones Saccharomyces, and the large volcano-shaped ones bacteria.
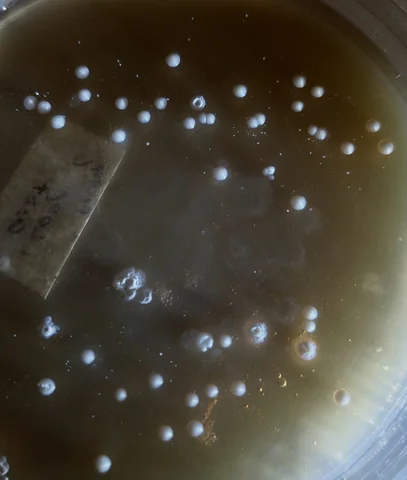 First plate · wort agar, 2+ weeks, ~21 °C
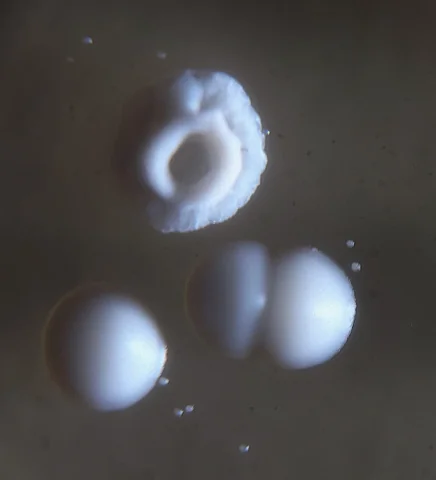 Three colony types, close-up · wort agar, ~21 °C
Tip
Don't give up on a plate early. Slow organisms can take two weeks or more to show visible colonies. Bacterial colonies are not always small: on the Shrinebuilder plate they were the biggest.
Tip (researched, Med)
As a rough guide, Saccharomyces colonies are visible at about 3 days and Brett at 5 to 10 days; bacteria can take longer. Brett colony morphology varies by strain, and two related strains in one sample can grow quite differently on the same medium. Sources: Milk The Funk: Laboratory Techniques, Milk The Funk: Brettanomyces.
Tip (researched, High)
Smell the plates. Brett ferments glucose to ethanol and acetic acid in the presence of oxygen (the Custers effect), so a vinegar note on an aerobic plate does not by itself mean acetic acid bacteria. Source: Milk The Funk: Brettanomyces.
6 · Pick lone colonies
Look at the plates under a magnifying glass to find lone colonies, well clear of their neighbours. Pick three to five at a time, each into its own tube of sterile distilled water.
Photo to come
Picking a lone colony under the magnifying glass; the sterile-water tubes, labelled.
Tip
Tiny colonies next to big ones are the trap: Brett colonies can be barely visible to the naked eye, and it is easy to pick a Saccharomyces colony and scoop some Brett with it. If the target forms the smallest colonies, pick only small colonies with nothing touching them.
7 · Microscope check of each pick
Look at each tube under the microscope and discard anything mixed. The aim is to end up with three to five tubes, each holding a single strain.
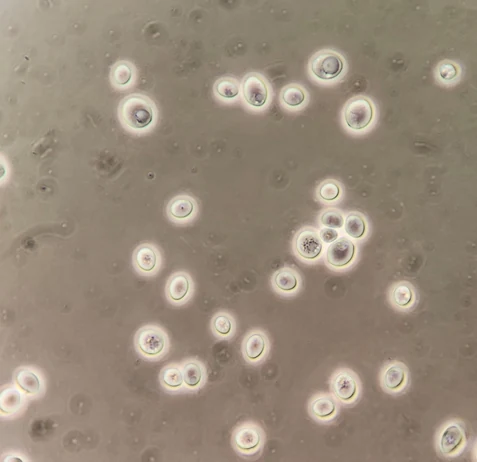 Saccharomyces pick · 1000x oil immersion, phase contrast, no stain
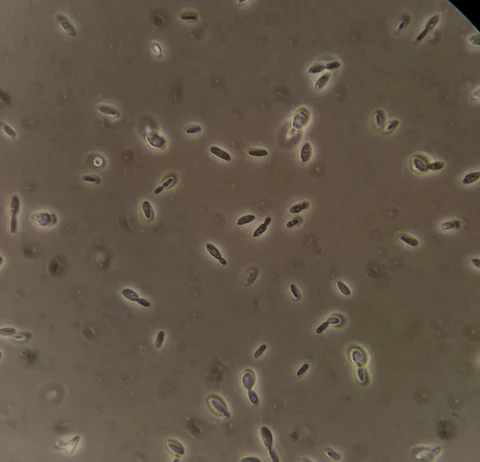 Brett pick · 1000x oil immersion, phase contrast, no stain
Tip
Be ruthless. A single cell that does not belong is reason enough to discard the tube; there are other colonies to pick.
8 · Confirmation plating, and a repeat round
Plate every tube that passed the microscope check, then discard the tubes. Repeat the round once more (recommended), especially if mixed colonies grew on the confirmation plates. Use the magnifying glass again and let the plates grow for 2+ weeks, as some organisms take that long to show visible colonies.
Both Shrinebuilder confirmation plates below were meant to hold only Brett; one got some Saccharomyces in, so another round followed.
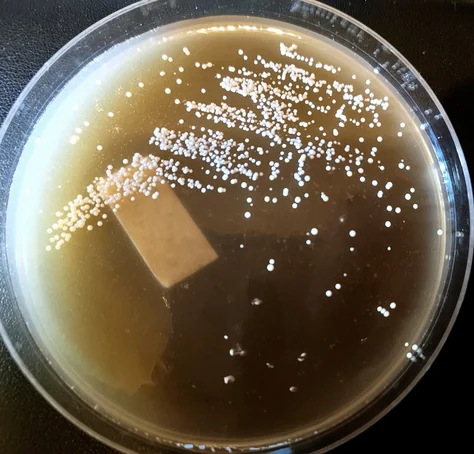 Confirmation plate: clean Brett · wort agar, ~21 °C
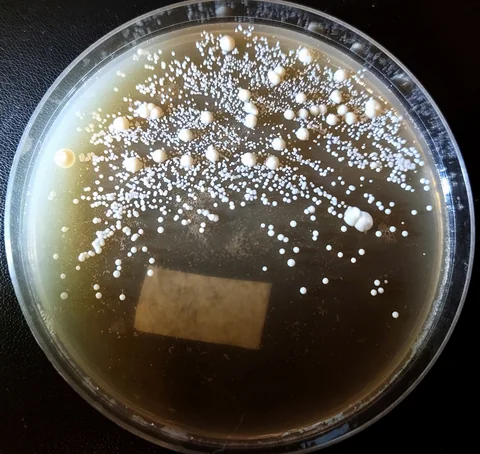 Confirmation plate: Brett with Saccharomyces contaminant (the larger colonies) · wort agar, ~21 °C
Tip
Plate each tube on more than one plate. Despite careful picking and a microscope check, something sometimes sneaks in, and a second plate shows it.
Tip
Colonies of one organism can look different. The Shrinebuilder Brett showed shiny and dull colony types; separated and tested, they showed no difference under the microscope or in test-tube beer, and were recombined.
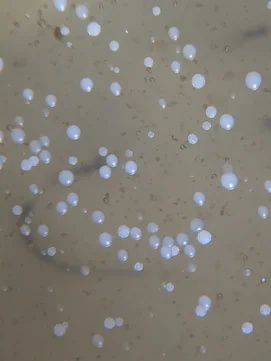 Shiny and dull colonies of the same Brett · wort agar, ~21 °C
9 · Clear-wort tubes, traced
From the clean plates, pick 10 to 20 colonies into test tubes of clear wort with no inhibitors, aiming for five or more tubes. Label and trace each tube to the plate it came from. Cultivate the tubes for 2+ weeks.
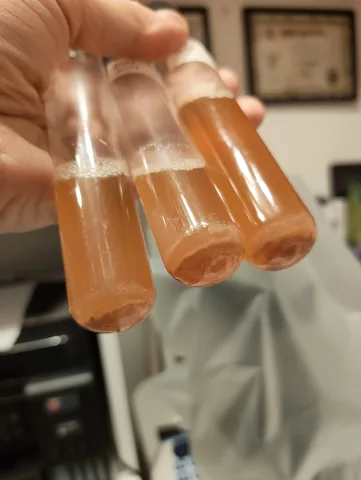 Brett tubes in clear wort
Tip
Clear wort, without coagulated proteins floating around, makes the next microscope step far easier: telling proteins from bacteria is slow and sometimes impossible. Pressure-cook the tubes twice: the first time drops the proteins, the second kills anything that got in while decanting the clear wort.
Tip
Use one label scheme on plates, tubes and slants, e.g. journey ID, round, plate and tube
(016-R3-P2-T4), so any culture can be traced back to the plate it came from.
10 · Full-slide check at 1000x
Examine each tube carefully under the microscope; scanning one full slide at 1000x is recommended. If undesirable bugs turn up, correlate them with what grew on the plates. Aim to end up with two or three clean tubes, then discard the plates.
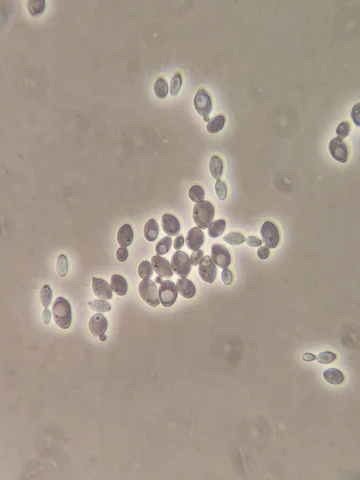 Clean Brett tube · 1000x oil immersion, phase contrast, no stain
Tip
Scan the whole slide systematically, row by row. A contaminant at low numbers only shows up in a few fields, and a quick look at the centre will miss it.
11 · Banking on slants
Prepare slants from the clean tubes and bank them, tracing each slant to its tube and culture. Record the bank in the bank inventory.
Photo to come
Labelled slants, and the bank storage.
Tip (researched, Med)
Slants are a good option for longer-term storage, from about 3 months to potentially 2+ years before re-propagating; many Saccharomyces strains keep about 2 years this way. Sources: Milk The Funk: Wild Yeast Isolation, Milk The Funk: Laboratory Techniques.
12 · Step up and brew mini-beers
Step the culture up in sterile wort until there is enough thick slurry to pitch into 200 mL of sterile wort, then ferment the mini-beers. Brewing the same wort at different temperatures, in parallel, shows how the organism responds. The Shrinebuilder Brett mini-beer was 200 mL in a 250 mL Erlenmeyer, 20 g DME, water under 50 mg/L alkalinity, ambient (~22 °C) for 4 weeks, repeated at 30 °C for 2 weeks.
Photo to come
Step-up vessels, and the mini-beers fermenting side by side.
Tip
Record original and final gravities: without them attenuation cannot be compared between mini-beers.
Tip
Test-tube beers are a hint, not a verdict. The Shrinebuilder Brett tubes smelled faintly of tropical fruit, but the 200 mL mini-beer was phenolic with no tropical notes.
13 · Assess the mini-beers
Assess each mini-beer for aroma, flavour, acidity, attenuation and clarity, and decide what the organism is for: bank it, test it further, or discard it. The Shrinebuilder Saccharomyces fermented super clean and super fast with no character, so, presumed bottling yeast, it was discarded.
Photo to come
Finished mini-beers in the glass.
Tip
When an organism does not deliver what the source beer promised, the cause may be the process rather than the bug. Esters, Phenols, Enzymes covers the levers worth trying.
Documentation, all along
Document every step as you go: colony morphology, yeast and bacterial cell morphology, plate smells, dates, media, dilutions, temperatures and days, and the mini-beer attributes. Each bottle gets a journey page; the organisms that come out of it get their own pages.
Tip
Photograph every plate with its label in shot, and note the medium, days and temperature at the time: they are needed for the captions and are hard to reconstruct later.